Showing posts with label socially distanced wargame. Show all posts

03 April 2021

The Second Half of A Plan

 This week saw the conclusion of The Battle of The Clouds, an AWI clash in which the British struggled to drive their way through the American line. The battlefield had split into two wings, with the Americans being able to set up murderous cross fire at the head of the two British attacks. It remained to be seen whether the British could keep up enough pressure on the American units in front of them to force a break in the line which would allow them to push on and remove the threat of the American artillery.


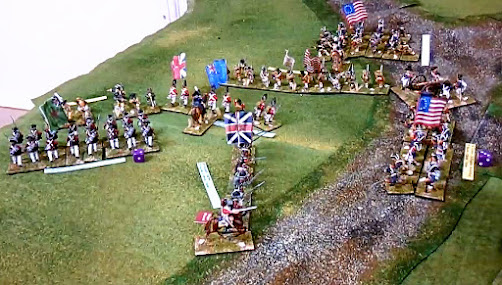
 A rather dizzying bird's eye view of the American left wing. British Lights are in the wood to the left whilst the Americans are poised to deliver volleys of devastating fire into the ranks of the advancing British.

Turn 6 saw the Americans gain the initiative and they declared a charge towards the British on this flank who opted to stand and fire. The 3rd Division pivoted to face the wood. The Queen's Rangers moved to the edge of the wood to threaten the 5th Division. The Hessians inclined to the right.

 On the right flank the British Guards charged, as did the 4th Brigade. The American column moved further along the flank in case the British managed to finish off their opponents.


Alexander's 5th Division failed to press home the charge and retreated facing the British. For a moment it looked as if the British had an opportunity to drive into the American line and escape the cross fire on this flank. Cornwallis readied his dice and prepared to face one more turn of cutting fire. However, one casualty from the artillery, and a total of four more from musket fire meant that Grant's brigade lost a base and this proved too much for them. Even though they were Veterans, the perils of their situation and the sustained mounting casualties proved too much for Grant and his men who promptly fled. Fortunately, the Hessians behind them stood firm. The 5th Division also lost a base from combined casualties from the Queen's and  Vaughan's brigade and the Militia took just one casualty. The sudden opportunity to make headway had vanished in an instant!
On the American right flank, the British charged home in a valiant attempt to shatter the Americans and send the Rebels packing. The Artillery had caused two casualties on the 4th brigade which lost a base and received three more from closing fire. The charge struck however  but whilst the casualties were three apiece from the melee, the 4th were severely battered from four turns of fire and they retired facing the enemy. The Guards crashed into Wayne's Division in what was probably the best British opportunity to punch through, but the Americans came off one casualty better and the Guards were forced to withdraw facing the enemy. The 3rd brigade fired a devastating volley at the troublesome American skirmishers meaning they too lost a base.


 Turn 7 again saw the Americans gain the initiative. The skirmishers fell back, the column moved forward onto the hill behind Wayne's division which fell back to clear the line of sight for its artillery.
On the other flank, the 3rd Division charged the edge of the wood, forcing the Queen's Rangers to evade and providing relief to 5th Division who were able to steady themselves. 
Above it can be seen that the British pulled back a little, holding on to the slender hope that a round of musket fire may cause Muhlenburg's Division to falter. It was not to be. Artillery continued to chip away at the Guards who stood firm. The American skirmishers finally routed from the field after another volley from the 3rd brigade, but their departure didn't make an impact on the morale of the Americans. Muhlenburg's Division also stood firm and the last hope of a British push crumbled away.


In the post battle discussion, we considered the challenges facing the British. For them to be able to put pressure on the Americans at a point of their choosing, it would require substantial maneuvering. The original half a plan sought to neutralise some of the American forces by pinning the flanks and concentrating the main thrust up the middle. The vagaries of command and control however meant that it's very difficult to pull off a coordinated attack. If one brigade refuses to move for a turn it can cause chaos and reveal intentions allowing the enemy time to react and reorganise to face the threat. It was a mistake to ignore the American skirmishers on the right flank. Perhaps if the Hessians had moved towards the centre and the 3rd and 4th Brigade had the flexibility to exploit American indecision on how to move to counter the thrust things might have been very different. As it was, the British withdrew, leaving American Divisions that were largely in good shape. We also need to consider the morale modifiers. Units are punished for losing a base, and if these are cumulative as well as being penalised for loss of 25% and then 50%, there is very little opportunity to be able to probe and then consolidate. Unless units are large, or the attackers have vastly superior numbers, the attacker has an almost impossible task.
Thanks to David for setting up the game, moving the figures and switching the camera views. Next week we will be in the Ancient world - Greeks against Greeks- trying out a set of rules created by one of our members.
Please consider following our blog and maybe add a comment below. It would be especially interesting to hear of any other refights of this battle in the light of our experiences. Can you come up with half a plan that sweeps the Rebels from the field?


22 March 2021

Half A Plan The Battle of The Clouds

 This week's game was an American War of Independence Clash, the scenario was based on The Battle of The Clouds and used a set of club rules drawing inspiration from Black Powder.


The Americans are deployed across the board under Washington, preventing the British from moving up the two roads.

General Washington (Average)

Green (Average) (numbers in brackets indicate the unit in the picture below)

1st Division - 1st Brigade – Muhlenburg (4)

16 figures, 4 stands, Trained

1st Division - 2nd Brigade – Muhlenburg (3)

16 figures, 4 stands, Trained

4th Division – Wayne (2)

24 Figures, 6 stands, Trained

Maxwell's Light Infantry (1)

12 figures, 3 stands, Trained

6 pdr gun Veteran

Whilst the British under General Howe, were driving up the two roads in a manner that would clearly lead to a split battle of two wings.

General Howe (Average)

Right Wing - Cornwallis (Excellent)

Advance Guard (Queens Rangers Light Infantry) (13)

8 figures, 2 stands,  Trained

1st Brigade - Grant (15)

24 figures, 6 stands, Veteran

2nd Brigade – Vaughan (14)

20 figures, 5 stands, Veteran

Hessian 1st Brigade – Stirn (16)

16 figures, 4 stands, Trained

6pdr gun Veteran 


Left Wing - Knyphausen (Average)

Light Infantry and Guards Brigade – Matthew (10)

20 figures, 5 stands, Elite

Hessian 2nd Brigade - von Donop (9)

24 figures, 6 stands, Trained

4th Brigade – Agnew (11)

20 figures, 5 stands, Trained

3rd Brigade – Grey (12)

16 figures, 4 stands, Veteran

The British "Half a plan" involved Knyphausen driving Mathew's Brigade through the woods, splitting the American line and exiting the board by the road beyond. Cornwallis was tasked with pinning the Americans in front of him so that they could do little to support the beleaguered center.

The plan however, began to fall apart from the first moment of the game (when doesn't it). The vagaries of battle deployment meant that Von Donop's brigade were deployed at the head of the column instead of the Lights, and they couldn't get through the wood.

To further complicate matters, issues with command and control often meant that brigades stubbornly refuse to move, usually at critical moments meaning it's very difficult to put together a coordinated attack.


The first turn saw Maxwell's Lights move forward and act as skirmishers on the Knyphausen's flank. The rest of the American forces waited to see where the British attack was going to come from. Knyphausen moved the Hessians up and inclined slightly towards the wood, with the intention of staying hidden from American artillery whilst the Lights would push through.
Cornwallis moved his brigades forward and the Queen's Rangers also moved up to the wood in front of them with the intention of harrasing the Americans beyond the road.


American artillery opened up but there were no casualties on either flank and the British were relieved by the fact that the bodies had not started to pile up yet as they faced a potential storm of shot.

The second turn saw the British gain the initiative. Again, Knyphausen urged his men up the road but the half plan was abandoned in favour of  a determined push into the mouth of hell. General Howe dug his heels into the flanks of his horse and dashed across the field to stiffen resolve if it should falter. Cornwallis continued to advance and the Queen's reached the edge of the wood.
The American Lights moved along von Donop's flank and began sniping, causing one casualty. Muhlenburg's second division wheeled and moved up the road to prepare flanking fire for the advancing Hessians. On the other wing, the American brigades mirrored the other flank and began to take up positions which would allow them to create a killing field.


The American artillery had found its range, causing two casualties on von Donop's Hessians and on the other flank one casualty to Grant's Brigade. The only British shooting resulted in one casualty on the American Lights.


It was at this point that Howe had hoped that Cornwallis would use Grant's Brigade and the Artillery to pin the American left whilst he made a dash down the road in an attempt to outmaneuver the Americans and give the British a sporting chance of achieving the objective. Cornwallis however continued to advance up the flank, heading straight for the carefully prepared cross fire. This was exactly the same situation as was developing on the American right flank.
Turn Three saw the Americans gain the initiative. The lights continued to harry the poor Hessians who steadfastly ignored them and kept pushing up the road.


Hits from the artillery meant that the Hessians lost a base. The American Lights fired at the Guards, causing one casualty and scored a further casualty on the 4th Brigade behind them. The Hessian morale stood firm as they drew ever closer to the artillery. Over on the other flank, the American artillery missed and the British continued up the road whilst the Americans waited, inclined to maximise their fire power when the British appeared around the wood.


Turn Four saw the British gain the initiative and they determinedly continued with their advance into the very teeth of the American guns. Cornwallis ordered his artillery around the wood and deployed dangerously close to the American line. Grant and Vaughan moved their brigades up slightly whilst the British skirmishers moved through the wood with the intention of finally finding a target.
The American left flank remained stationary whilst on the right, the gun pivoted to catch the hessians in its arc of fire and Muhlenburg moved up the hill to act as a reserve if the British succeeded in punching through.

The shooting phase saw volley after volley of devastatingly effective fire from  the Americans. The British artillery lost three casualties and the crew promptly fled into the safety of the wood. The beleaguered Hessians bore the worst on the American right, losing two bases. The resulting morale check meant that they routed, and streamed down the road past the Lights and the 3rd Brigade who fortunately stood firm. All credit to General Green who had positioned his forces to create a deadly cross fire, whilst the American Lights had accomplished their purpose admirably.


Cornwallis faces the same horrific cross fire as von Donop. Washington, positioned near the farmhouse, looks on with grim satisfaction.

Turn five saw the slight adjustment of the American right flank to face the threat of the British Lights who were closing on Wayne's battered division. Muhlenburg formed into line behind them as support whilst General Howe failed to stop the rout of the Hessians who were removed from the field.
The shooting phase saw more misery for the British as the Lights lost two bases but stood firm. Their return fire on Wayne's division caused slight consternation as a musket ball whistled close to their General. The British skirmishers on the other flank were finally in a position to fire upon the enemy, whilst Washington closed in on the advancing British using the wood to secure his flank.


And there we paused the game until next week. The British face a monumental task. The terrain means that they are funneled into two narrow channels that have become killing fields. The often ponderous nature of movement and a reluctance to follow orders makes mounting an attack in which wave after wave drives the enemy back is extremely difficult. It remains to be seen whether the British can crack a hole in the line and take advantage of this to roll up the enemy either side. Will they falter as they step over the pile of dead into the very teeth of the guns and muskets lined against them?
We'll find out!


04 March 2021

Revenge For The Sherman!

 This week, we gathered once again around our screens to finish off our Rapid Fire game from last Monday.

The Germans had made noticeable gains on the right flank and the loss of one of the Shermans meant the Americans were extremely nervous. As the Panther trundled down the slope to support the flank, the infantry readied their grenades and prepared to rush the Armored Car, which was cowering behind the hedge.


Heavy damage from the Panther immobilised the vehicle long enough for the Germans to stroll up and pop in a grenade. Although this meant that the flank was now clear and attention could be focused on the center, the Panther had presented the Americans with a juicy rear end shot.

American mortar shells screamed down onto the road, catching a couple of unfortunates before the rest of the Infantry were ordered to lie down and effectively disappeared from view!


It was a now or never moment for the Sherman, which pulled out from behind the building, poked it's 76mm barrel through the hedge and fired.

It missed!

The horrified crew watched in terror as the Panther swiveled round to punish the American audacity. It had already proved it's deadly efficiency with an amazingly accurate shot last week, and it seemed the inevitable awaited.

As the focus of the battle had now switched to the right, the M36 started to make a dash between the half tracks to hopefully have a crack at the Panther.


A fierce debate broke out over whether German mortars would inflict damage on the crew of the M36, as shrapnel pattered over its armor. The remaining GIs running up to the farmhouse were so intimidated by the proximity of the Panther, that they failed to reach the safety of the ruins and ended up in an embarrassing heap.


The Panther fired, causing heavy damage and it was assumed by everyone that it was only going to be a matter of time before the Germans forced an American withdrawal. The only hope seemed to be that the Germans had forgotten about the remaining bazooka and there might be a chance for a lucky shot.

The German infantry continued to lie flat, out of sight of the American spotter. They were content to watch the Panther wreak havoc, intending to come up and clear the farmhouse of the mangled remains of GIs.


Surely it was a matter of formality, surely it would be a simple shot. The German players were already looking at the fire table to calculate the most efficient way of cutting down the GIs before the M36 could intervene.

The miss was a delicious piece of Teutonic hubris! The amazed Sherman reversed back around the corner out of sight with the crew having a story to tell their children.

The M36 parked up behind the ruined farmhouse and the American infantry finally made it into cover.


As is often the case in armor duels with Rapid Fire, the tactical considerations are demanding. The Americans could just sit tight and hope the Panther made a mistake in positioning itself for a shot, or they could try and seize the initiative and offset the movement penalty by closing and shooting from an obscured position in case the Panther survived.

It hadn't worked well for the Sherman and although the M36 had a better class gun, it would probably only get one chance. The flimsy shed offered no protection from armor piercing shells but at least it did mean partial obscurity. Fortune favours the brave apparently, so the M36 bravely stopped by the shed and slammed a shell into the Panther.


The shot caused heavy damage, which meant that the Panther had to sit there getting a taste of it's own medicine whilst the M36 closed in to finish it off.

The German mortars dropped smoke in front of the M36 in a desperate attempt to buy time but the M36 drove through it to close range. Emboldened by their success, the Sherman also came back round the corner and lined up for another shot.

The Sherman fired first and missed-ramping up the dramatic tension and giving the Germans hope. Hope that was cruelly dashed as the M36 knocked out the Panther to the sound of cheers from the GIs.

The Germans were forced to withdraw and the Americans had managed to hold onto the crossroads and beat off the counter attack.

The post battle discussion centered around the German decision to split their armor. Having only the Panzer on the left flank meant that the Americans were able to consolidate their forces and face the Panther. The US Armored Car performed heroically stopping the German Infantry from sweeping up to the crossroads and supporting the tanks. By the time it was knocked out, the infantry were battered and in no shape to storm the ruined farmhouse.

We made a decision to apply negative modifiers to both shooter and target if they had moved, which made careful planning all the more essential. It could have resulted in a stand and shoot situation but the Panther's decision to come forward to support the infantry was critical.

We've learned an awful lot from running these games. The larger scale makes it much easier to see what is going on. A skirmish game provides challenges and frustrations for the players when line of sight becomes critical and it's difficult to judge whether you're safe or caught in the open. This game seemed to be a balance between a small action with a few forces and the larger scope we need to be able to play effectively. We've played several games of large scale units which are easier to control and manage your forces once you remember which unit is which ( flags are a great help here!)

Massive thanks to our game host who patiently moved our forces, worked out lines of sight, positioned cameras at key moments and made the whole thing possible.

27 February 2021

The Sherman Cops It Again!

 As part of what has become our regular Monday night lockdown club session, we played a Rapid Fire game involving a US Recon force which had just chased off some German infantry and were holding a farm situated on a strategic crossroad. As the Americans are taking defensive positions, they are threatened by a German counter attack US reinforcements are coming up the road from the North but the Americans face a determined thrust which seeks to retake the crossroads and hold up the American advance.

We were using 1:35th figures and vehicles which we've found are easier to see on camera and although Rapid Fire is designed to be played at battalion level, we took a more skirmish based approach. We also scaled up the ranges by a factor of 1.5.


A ruined farmhouse and shed opposite a blasted house situated at the crossroads.

The Recon force consisted of : HQ with Jeep
1 Rifle Company of 8 figures armed with bazooka.
30 Cal machine gun.
Half track transport.
M8 Armoured Car.
75mm Sherman.

The terrain consisted of some hills to the South East, hedges lined the roads and a few patches of woods offered much needed cover.
As the Germans made their way to their starting positions, the Americans nervously looked  up the North road for any sign of reinforcements.


The German force boldly approaches the crossroads. Two half tracks and a lorry push down the right flank. A Panther lurks hull down on the crest of the hill with a commanding view of the crossroads whilst a Panzer IV threatens the left flank. The M8 Armoured Car nervously hugs the hedge at the edge of the Eastern road, whilst the Sherman sits ready to take on the Panzer.
American reinforcements barrel down the Northern road in an attempt to relieve their already hard pressed Recon buddies.

The first German turn saw a decisive thrust on the right, no doubt hoping to get into an advantageous position before the reinforcements could arrive. The Sherman at the crossroads had to decide which armoured threat to face and chose to try and knockout the Panzer before the Panther could intervene.
Unfortunately for the Americans, the Panzer caused heavy damage and the Sherman had to sit there for a turn and hope it would survive a second shot.


The US Reinforcements consisted of : an off table 81mm mortar.
1 Rifle Company with bazooka in a half track.
1 Rifle Company riding on the Sherman.
76mm Sherman.
M36 Jackson.

The Sherman pelted down the road towards the crossroads whilst the M36 pulled up behind a hedge. The half track pulled off left and made it's way towards the farmhouse, hoping it would stay out of sight of the Panther.

It's been said that the Americans don't understand irony-this game was loaded with it! As you will no doubt have guessed, the Panzer rolled two sixes to destroy the Sherman at the crossroads whilst the Panther took a "Well I'll just have a go shot at the half track and destroyed that before it was half way through it's move. Damned Reserve Fire!


So far, for the Americans, this battle seemed to be going along depressingly familiar lines. The German armour carves up American tanks and leaves their infantry to mop up the cowering GIs.
The other Sherman had managed to pull up behind the house and the Rifle Company gratefully scrambled into cover. The Recon half track had pulled back from the hedge in front of the Panzer and made it's way across the road. No doubt the sight of a blazing half track and a mangled bazooka gave them a nasty scare.
The presence of the Panther caused a great deal of consternation as US troops scurried backwards and forwards, repositioning themselves as the tank shells whistled in. Much to the amusement of the Germans.


The German Infantry on the right had not been hanging around and were keen to grab some of the glory for themselves. Debussing from the half track they made their way towards the hedge with the intention of driving off the M8. They were badly shot up by the heavy machine gun, the 30 cal and a round of mortar fire which dropped on them after it had put down smoke in front of the Panther.

It wasn't enough to put them off though and they lined the hedge, called up the two Panzerfausts and got ready to charge.


A bitter hand to hand combat swirled around and through the hedge, resulting in the 30 cal crew being wiped out but the Germans decided to stay this side of the hedge. Two shots from the Panzerfaust bounced off the armoured car which promptly reversed along the hedge, leaving the German Infantry battered and bloody, but in possession of the right flank.

Meanwhile, over on the left, the Sherman peeped cautiously out from behind the building and took revenge on the Panzer IV-leaving it a smoking husk of smouldering metal in the middle of the field.


It was at this point that the evening had to draw to a close and we decided to continue the game the following week. We're all set up for a classic challenge-a Panther commanding the battlefield with a nervous Sherman playing hide and seek! Can the Germans capitalize on their dominance on the right flank? Can the Americans sneak up with a bazooka and knock out that pesky Panther?
With the armoured car and M36 still operational ( for the moment ) the Germans are going to find it a tough job to drive the Americans off and take the farm.


16 February 2021

ACW - Battle of Jonesborough, 1864 (part)

Another socially distanced club game. This was based on Cleburne’s left wing hook against the Federals at Jonesborough at the conclusion of the Atlanta Campaign. In this refight, Kirkpatrick’s Cavalry Division successfully delayed and disrupted the Confederate juggernaut.....then, we ran out of time. GA Smith’s Division had taken up position in the hastily erected defences west of the rivers and awaited the Confederate assault. An assault that never came.

The rules used were the original Fire & Fury. Almost all of the figures are Perry Miniatures.


09 February 2021

05 February 2021

The Battle of "Lockdown Moor" - Running a Socially Distanced ECW Game


(Fictitious) Battle of "Lockdown Moor", 1643


Background


Once Upon a Time in The West….Riding……


In the summer of 1643, both Royalist and Parliamentarian forces operating in the West Riding of Yorkshire, had hoped to secure the rotten town of Lockdown for their respective causes. The highly independently minded and non-aligned Clubmen Associations of Lockdown violently denied access to the town and successfully fended off such attempts. The opposing forces from both sides met in battle on the nearby ‘Lockdown Moor’. Both sides had extended their supply lines and, with access to Lockdown denied, must defeat the enemy on this very day!


Royalists


Commander: Earl of Newcastle

Deputies: General James King


Foot

Regiment: Veterans, 4 pike, 4 shot

Regiment Trained, 4 pike, 2 shot

Horse

Regiment: Veteran Gallopers, 6 bases

Regiment: Trained Trotters, 5 bases

Regiment: Trained Gallopers, 4 bases

Artillery

1 x medium gun, trained

1 x light gun, trained


Parliamentarians


Commander: Lord Fairfax

Deputies: Sir Fairfax (Son) and

General John Gifford


Foot

Regiment: Trained, 4 pike, 4 shot

Regiment: Trained 2 pike, 4 shot

Regiment: Raw, 6 shot

Horse

Regiment: Trained trotters, 4 bases

Regiment: Raw trotters, 4 bases

Dragoons

Trained, 5 bases


Scenario Notes:

·       Hedges are only 4ft - 5ft high, can be seen through and are fairly sparse. They count as soft cover if fired through for all save troops positioned immediately up against them.

·       The town of Lockdown cannot be entered. The battle will be on a c.5’ x 4’ table.

·