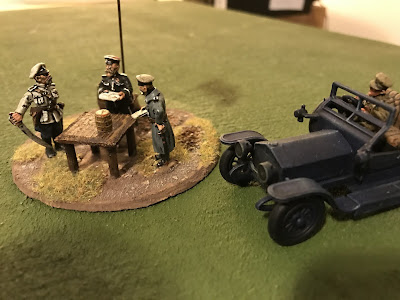
This week's game was set in Russia 1918 -21 during the Russian Civil War and used a homebrewed set of rules based around the Black Powder system, which always leads to some interesting results when units are reluctant to move up and engage the enemy, or have the complete opposite and hurl themselves forward in an unstoppable rush!
The scenario involved a classic battle for domination with the Reds approaching from the North facing the Whites who advanced from the South, towards two villages. One of these villages stood in the centre at a crossroads, whilst the other was on the Eastern flank. A fordable stream ran along this Eastern flank and there were a few clumps of trees breaking up an otherwise open battlefield.
Again, we were using 28mm scale which is easier to see when playing an online game, and we were looking forward to playing something with a slightly different flavour to it.
The Umpire had given each side a choice of strategic advantages which are secret from the enemy. This brought an element of tension to the engagement as each side wondered what cards the other was holding up their sleeves and plans had to be rapidly adapted to cope with new developments.
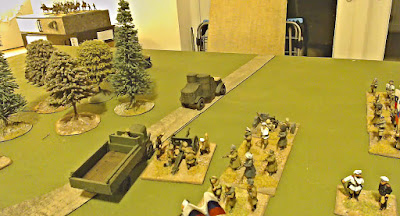
The Reds deploy, ready to take the objectives. The armoured car prepares to advance up the road whilst three regiments are deployed in columns, screened by a wood and supported by artillery. A battalion of cavalry are mustered just to the left of the road. Behind them, an Agitprop unit stand ready to stiffen the resolve of their men, whilst off picture to the left, three battalions are ready to move up along the stream towards the village.
Facing them to the South, the Whites deployed three battalions on their right flank, one in line to the front and two in column behind. Their limbered artillery was alongside the road and two battalions of Cavalry are poised to make a dash for the central village. A White General was heard to be muttering concerns about being riddled with machine gun fire from the AC, whilst the Reds were disturbed by the lack of White units visible on the table.
You're expecting me to ride my cavalry up that road straight into the barrel of that Armoured Car!
The first turn saw the Whites gain the initiative, and the Cavalry duly followed their orders and dutifully trotted up the road, some of them to dismount and try and hide as many of their men behind the buildings as possible. The crew of the AC were no doubt cursing the limitations of IGOUGO and lack of reserved fire-let's just assume they'd forgotten to load up the ammo belts!
Meanwhile, on the Western flank, the White infantry showed a remarkable reluctance to move forwards. Perhaps they'd seen the Cavalry's situation and decided to let them be a target rather than draw machine gun fire onto themselves. The regiments only action was to pull up their artillery slightly forward.

To the North, the Agitprop Officers were screaming at their men through loudhailers, exhorting them to cut down the White traitors. It obviously made a great impression on the three raw battalions on the Eastern flank because they all moved up to the stream, determined to take the village and perhaps begin to turn the White flank. The Red cavalry moved up behind the wood in front of them and dismounted, ready to push up next turn. The armoured car barrelled forward and fired a burst down the road, causing the first casualty on the dismounted White cavalry in front of them. It had used it's strategic advantage of a double move on it's first turn, much to the consternation of the White General.
To the West, the three Red battalions also moved forward, the sailors bravely intent on reaching the village before the Whites could get a foothold, whilst one battalion moved around the wood to face the hesitant Whites. The sight of an artillery piece became their main concern which quickly neutralised the Agitprop "encouragement".

The second turn again saw the Reds seize the initiative, but whilst the sailors continued to get on with the job, the rest of the infantry began to have serious doubts. The three battalions on the Western flank decided that they were happy where they were and it was left to the artillery to unlimber and pick a target. The dismounted Red cavalry moved to the edge of the wood so that they could provide covering fire for the sailors. The raw training of the Red Eastern battalions hit home hard, as they refused to move another step forward until their concerns had been addressed. As many of them floundered around in a shallow stream, it became clear that there were a lot of concerns and it was going to be a long, slow advance-if at all.
The elite experience of the White cavalry meant that they ignored the death of one of their own and triumphantly pushed into the village. Those that could, sought shelter in the buildings, whilst the remainder hid out of sight of the AC, furious that their rifles would have no effect on its armor.
The White artillery unlimbered and prepared to blast apart the AC, whilst the infantry finally decided to follow orders and began to move forward. The White gun managed to hit the AC, which fired on the cavalry in the village to its left, causing three casualties. The Red gun caused a casualty on the unit in front of it. Bullets were flying around all over, as each side blasted away at anything it could see. The White Tchanka with the Cavalry caused a casualty on the Red Cavalry hiding in the wood, whilst their return fire proved useless.

The third turn again saw the Reds take the advantage. The stumbling battalions on the Eastern flank finally got into some sort of order and moved across the stream to get within touching distance of the village. It seemed that victory was within their grasp. The Red cavalry remained at the edge of the wood to trade shots with the White Cavalry. The Red Sailors stormed towards the building intent on inspiring their comrades and driving out the decadent White Cavalry who were smashing firing holes in the walls. Totally uninspired, one battalion remained behind the woods but the other continued to advance in column towards the nervous White infantry across the field. To the amazement of everyone on the field, the AC took it into its head to perform a death or glory charge, straight down the road behind the White lines. Its Officer insisted on being mentioned to Comrade Lenin personally for this act of bravery/lunacy.

It was a this point that the Whites revealed their strategic advantage, a regiment of infantry with artillery, appeared on the Eastern flank and immediately snatched control of the objective away from the Reds. Poorly trained troops were facing a highly trained enemy who had outmanoeuvred them and had much more fire power. The Agitprop unit hurried over to bolster the resolve of its cannon fodder who now faced a real challenge. Still picking his jaw off the floor, the White artillery Officer ordered his gun to be manhandled round 180 degrees to fire South at the AC in an attempt to stop it wreaking havoc on the terrified White Infantry. Never in the filed of human conflict has so much consternation been caused to so many infantry by one armoured car Sorry, I couldn't resist!).

Once again the bullets and shells began to fly. The Red artillery caused one casualty on the Cavalry to support the Sailor's attack. The Red and White Cavalry traded fire, resulting in a casualty on the Tchanka and a dead cavalryman, whilst the Reds lost a base from the machine gun and rifle fire, but the raw Cavalry stood their ground. On the Eastern flank, the White artillery caused three casualties on the Reds who managed to kill two in return, but a further casualty on the Reds from infantry fire meant they would have to take a morale check. The Agitprop screamed through the loudhailers once more and prepared to shoot deserters.
But what about the AC I hear you cry? What about the insane/brave crew of the tin box on wheels? As its machine gun killed three Whites, two artillery shells struck it full on - and bounced off the armour. Thank Lenin for the engineering skills of the Petrograd Shipyard!
The Sailors stormed into the building and easily drove off the White Cavalry, although they did receive three dead from close range closing fire. This meant that the middle village was a contested objective for those that are focused on the Scenario, whilst the Whites are in control of the other objective and it seemed highly unlikely that the raw battalions would be able to kick them out. Just take a moment to appreciate the view of Comrade Vasileyev who is shooting a fat, bourgeoise Cavalryman through the window of a humble, proletarian cottage.
Because they were Elite as well as bourgeoise and fat, the White Cavalry regiment refused to flee the field, even though they had seen their fellows wiped out by Red nautical chappies.
And there we had to leave it I'm afraid. It's always difficult to predict how the battle might go if it continued, but it's unlikely that the Whites would lose the Eastern village and the Reds may probably drive off the Cavalry Regiment in the centre. All in all, a highly enjoyable game that was made extra interesting through the use of Strategic advantages. We knew to expect something, but not what, and this gave us a feel for the fog of war. We take it for granted that we should be able to react to what's on the battlefield with our God like perspective, but this isn't the case in warfare. Map movement is tedious and causes arguments, so this device is a great way of adding strategic complications to the scenario.
Thanks to Keith for hosting the game, swapping cameras, moving troops and settling disagreements. We look forward to next week's AWI game using 28mm scale figures, so that we can identify who's who. I'm off to write up the Agitprop report, detailing the inspiring heroism of our AC and the dastardly cunning of the flank marching Whites- who, it must be admitted, did time their arrival to perfection.


